Friday 24 June 2016

How to do a Website Analysis for SEO- SEO Audit guide SoftLoom IT Solutions


website analysis or seo audit guide
A great SEO campaign done with all the right SEO tactics and techniques can help a company's website secure its position in the first page for the related keyword.
Why website analysis?
A well-laid plan is half the battle. So planning is a must before an SEO campaign. A properly carried out website analysis helps you to know of all the weak areas which need focus and the keywords you must be targeting. A website analysis is an important step for formulating a solid campaign. Click on the source link and get the all-in-one advice to performing SEO Audits/Website analysis. It can surely help you build a strong online marketing campaign!

Wednesday 1 June 2016

The 8 SEO Trends to look out for in 2016

The 8 SEO Trends to look out for in 2016


SEO trends 2016See whether you are prepared for all the SEO trends that will be dominant in 2016. Google algorithms are updated all the time and we must keep up with all the changes.

Else it's time that you lose to the competitors. Don't let that happen and waste your efforts! The blog on SEO trends 2016 will help you keep updated with all the latest changes in the algorithms.

Sunday 22 May 2016

How to get your website indexed on Bing

Being indexed on Bing is easy and the best part about this is you automatically get added on the Yahoo search engine too.

Before submitting your website to Bing, you need to have a Microsoft account to be able to sign into Bing. So make sure you create a Microsoft account by going to the official webpage of Microsoft to create an account.


Now let's get started to submitting your website to Bing.


Step 1


After you have created your Microsoft Account, go to the Bing Webmaster Tools webpage and sign in with the Microsoft account you have created earlier.


Step 2


Enter the URL or link of your website in the space provided.


Step 3


If you have a sitemap generated for your website, add the same here. Else just enter your website address and then after the "/" enter "sitemap.xml". Then click on "ADD" button.


Step 4


When you come across this page, select the best convenient option to verify your website. I verified my BlogSpot blog using the second option which is the Meta Tag verification option.

Copy the meta tag code.


Step 5


Now go to your website source, find the <head> tag insert the copied meta tag just before the end of the tag </head> .
BlogSpot website owners can go to their Blogger dashboard, click on "Template">"Edit HTML".


Step 6


On reaching this screen, paste the code inside <head> tag. You can use the CTRL+F command to find this tag.


Step 7


Come back to the Bing Webmaster Tools page, click on "Verify" button.


Step 8


If you are successfully verified, you come to the following dashboard page for your website.


Step 9


On the left hand side menu of the dashboard, click on "Diagnostics and Tools">"Fetch as Bingbot". On the box provided, enter the link or URL to your website and click "Fetch"


I have crawled my homepage and on doing so, here's how it looks like.


Step 10


For crawling individual BlogSpot post, copy the entire URL of each post and add it to the box provided.

This is how it looks like. You can see the URL and status of your website on the table underneath. The status is indicative of whether your website has been crawled or not.


If you have made any changes to your website or blog post after you have fetched/crawled it, you can use the "REFETCH" button to re-crawl your website.


Let me know in the comments section if you've submitted your website/blog to Bing in the comments. Check out my blog to know how to submit your website to Google or  how to get indexed on Google. Stay tuned for my latest tips and tricks on SEO!


Wednesday 11 May 2016

The Beginner's Guide to using Google Analytics

As you can see from my last blog posts, I've talked about Google Algorithms and updates, SEO On Page Optimization techniques and on how to submit your website to Google. Today I am excited to show you an interesting free tool provided by Google known as the Google Analytics. This tool is so awesome and is a must-have for marketing online. It is also very useful for SEO purposes and also know how you can tailor your website to the needs of the users.
Google Analytics for your website

The Google Analytics tool was launched in November 2005 and uses cookies to monitor the traffic and user activities. Hence, if cookies are disabled by the user, the system can't collect data from them.


Why should you set up a Google Analytics account for your website?

Now the question is why should I set up a Google Analytics for my website. Here's a list of some awesome stuff you can do with the free tool:
why to use google analytics for your website
  • You can track the incoming traffic to your website, the time a user spends on your website.
  • You get to see the location of the best visitors.
  • You get to know the content/webpage your audience is most interested in by learning what people like to search on your website.
  • You get to know what people click on the most.
  • You get to know the best points of conversion on your website as well as when the users leave your website.
  • You also get to identify poorly performing webpages on your website and work on them for improvements.
  • You get the data to take decisions on what advertising strategy you must adopt for a higher conversion rate.

How to  set up Google Analytics for your website

 Through a series of steps I am going to show you how you can set up Google Analytics for your website and begin tracking.
1. First you need to go to the Google Analytics home page and click "sign up". Make sure you are already signed in to your Google account prior to this one.

2. After you sign up, you arrive at the following page. Here you have to enter a name for your account, a name for identification of your website as well as your website URL. As you can see here, I have already entered my account name, site name and my website URL which is maryamseo.blogspot.com

3. An important thing to take note at this point is about the reporting time zone. You can have about hundreds of client websites from different counties under your Google Analytics Account. So it's best suited to add the respective time zone of the country in which the website is based upon. Since my website is based in India, my time zone here is the same. If you are from the US, you should also specify the same as your time zone.

4. After selecting the reporting time zone, go down and click on the "Get Tracking ID" button. As you do so, a new window gets displayed with the "Terms of Service Agreement". Here also choose your country and then click "I Accept".

5. You arrive at the below given page with a unique tracking ID as well as a Google Analytics tracking code. You have to copy the code and paste it into the HTML section of your website.

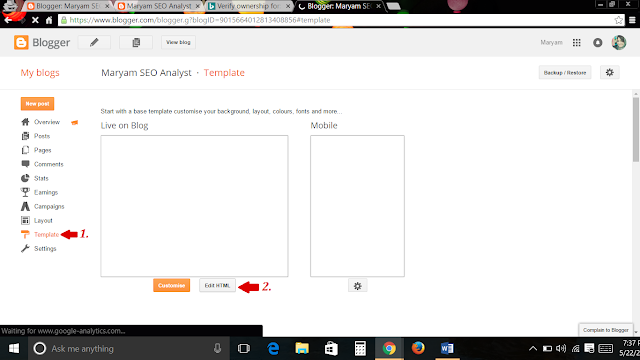
6. As I am using a blogger account, I go to my blogger dashboard and choose "Template" on the left hand side menu of my dashboard and then click "Edit HTML".

7. On doing so, I get the HTML source of my website. I go to the "Head" section and insert the Google Analytics tracking code just before the end of "Head" section as you can see below. Then click "Save Template".

Others can do this by going to their website's HTML code and paste the code straightaway inside the "Head" section of the website. Results will be the same.
8. Now go to the "Home" tab on your Google Analytics website and click on your account name. It expands to show your website underneath the account name. Below that, click on "All Web Site Data".

9. On doing so, you arrive at the below screen. You can get an statistical overview hourly, daily, weekly or monthly here. Since I have just started using the Analytics for my website, you can the graph is just a straight line. The regular users will see an upward/downward movements on their graph.

10. You can also view real-time data by clicking on "Real time" on the left sided menu and the clicking on "Content". This shows any user activity at that time on the website as well as the webpage which he or she is currently viewing in the table below.

You can also view the location from which the user is visiting your website by clicking on "Location" under the drop down list of the "Real Time" tab. As you can see here, someone is viewing my website from my own country "India" which is marked in green in the map therein.

If you had found this blog useful to set up a Google Analytics for your website, mention that in the comments below. Stay tuned to my blog for more upcoming SEO tips and tactics!

Sunday 8 May 2016

How to get your website on Google

As I promised in my last blog which was about some SEO Optimization techniques, today I am going to guide you on how to use Google Webmaster Tools now known as the Search Console for submitting your website to Google. That’s right! You need to submit your website to Google to get listed. For this you need to visit the official Google Webmaster Tools website.


Step 1

If you are already signed in to your Google Account you will come across this page. For first time users, you need to click on the “Add a property” button on the right hand side.
The ADD Property Screen


Step 2

Then you come across this screen wherein you have to enter the URL of your website. For illustration purpose, I have entered my website here which is maryamseo.blogspot.com.
Enter-your-website-url


Step3

Next you come across the screen below wherein you have to choose the method on how Google can verify your website and its ownership.
google-verification-methods
If you have a website along with access to the source file, you can choose the first option to upload a HTML file to your website. An alternate method is to sign into your domain name provider. If you already own Google Analytics and Google Tag Manager Accounts, you can use the third and fourth option.
Since I merely own a blog at blogger.com, I am using the “HTML Tag” verification method for my website. You can use the same if you have a BlogSpot blog and want to get indexed in Google. Those who manage their own websites and have access to their source code file can also follow this method.

Step 4

On clicking the fifth option of using a “HTML Tag” to verify your website, you will be provided with a Meta tag. Copy the same.
meta-tag-verification
As mentioned therein, you need to insert the Meta tag code into the <head> section of your HTML file for your website, which is just above the <body> section.


Step 5

Since I am BlogSpot website owner, I add the Meta tag in the following steps.
Go to your blogger dashboard and click on your blog. You will come across a screen with your blog posts, if any. Find and click “Template” on the left hand side and you will reach this screen below. Click “Edit HTML” to access your HTML file.

click-on-edit-html


Step 6

Next you need to find the <head> section and insert the copied Meta tag in it as shown below.


Step 7

After inserting come back to Screen and click on "Verify"  button. This takes you to the following screen. Tada! Now you are officially verified by Google.
 Click-on-verify

Now your website is successfully submitted to google.


The next step is getting crawled, cached and indexed by Google. Follow the steps mentioned below for the same.


1. Come to the Google Webmaster Tools homepage as mentioned in the first step of submitting your website to google. Next click on your website URL given on the Google Webmaster Tools home page.
 
2. After you are directed to the below screen, click on crawl, then from the drop down list which appears, click on "Fetch as Google"


3. After you have reached the below screen, you must submit your website URL here once again. If you are submitting the home page, you can leave the box blank. Whereas, if you are submitting a new post or page of your website, the URL portion after the home page part of the URL is to be entered.
 
That is, in case of my website maryamseo.blogspot.com is the home page and http://maryamseo.blogspot.com/2016/05/how-to-get-your-website-on-google.html is the link to my individual blog post. When I submit my blog post I only choose this part of the latter URL which is : 2016/05/how-to-get-your-website-on-google.html
After you have entered the above into the box, click on "Fetch".


4. As you can see, the website is now fetched or crawled by Google and the same appears on the table area below. Therein you can see a "Submit to Index" button. Click on the button.


5. You will be directed to this screen where you have to choose between two methods of submission.

If you are submitting your website's homepage, you can click "Crawl only this URL". On the other hand, if you are submitting a post or page with links to your own website's home page, you may choose the second option which is "Crawl this URL and direct links". Click on "Go". Now your URL and linked pages will be submitted to Google's index.

When your website has been successfully indexed, it appears in the table area below. You can see my current blog post which has been submitted to Google, marked in green.

If you follow all these steps accurately, you will surely get indexed in Google. Let me know if you done so by posting in the comment section below. If you have any questions, feel free to ask via comments. Stay tuned to my blog post for more interesting articles for new bloggers as well as SEO professionals.

Thursday 5 May 2016

SEO Optimization Techniques for Higher Ranking

Today we are going to discuss about some prime factors to keep in mind in order to make Google love your post and provide you with a higher ranking in its related searches. We will be talking about tips to improve in terms of keywords, hyperlinks, image optimization, establishing authorship online. This post is for those who have started blogging like me and wants to get listed on the top in search results.

1. TITLE TAG OPTIMIZATION:

The best title tag is one which ranges from 45-65 characters and speaks out what your website is really about in the most efficient and persuasive manner. The title tag should contain the necessary keyword but should not be keyword stuffed. This title tag shows up in Google search results.

1. KEYWORD OPTIMIZATION:

Keywords are the words which a user enters into a search engine as part of a query regarding it. This keyword is also the very foundation of your article/website and you aspire to be listed in that keyword on top in Google's results. However, few things are to be kept in mind while making your website/blog.
Keyword Optimization

Keyword Density: 
It is the ratio of number of keywords used in the article to its whole number of words and is expressed as a percentage. For example, if your keyword is used just once in a blog containing 100 words, then the keyword density for the same is 1 per cent.

  •  Google has stopped taking the number of keywords as a chief factor in search engine rankings way back as established in Google's blog in 2009. So you don't need to stuff your content with lots of keywords here and there.
  • An acceptable keyword density is 5%. If you wish to increase the number of keywords beyond that, it is suggested that you expand your content to meet the same density.
  • Formatting a keyword in a para in bold or italics serves no purpose to increase rankings but it can help by enhancing a user's readability and hence increase the amount of time spent on the website. When a user spends a reasonable amount of time on your website, the same is recorded by Google and the Google bots think that this site is providing some really interesting information. This indirectly increases your rankings.
  • Positioning the keywords just before a full stop or a comma can give clarity to the Google bots on what your page is really about. Just like humans, the Google bots also crawls on the webpage contents and stop at full stops. When a keyword is assigned right before a full stop, it stops at the keyword and hence renders the website identifiable, thus enabling listing in the appropriate keyword search.

2. LINK/ ANCHOR TEXT OPTIMIZATION:

Adding links to your website/blog is great especially when you want to show a reference to another webpage so that people can dig deeper into that specific topic. But you have to bear in mind certain techniques about linking which can help you website attain top rankings.
Anchor Text Optimization/Link text optimization
  •  When you add links to a website under the keyword, it is that website not yours that earns credibility and gets listed on Google. This can also result in unwanted distribution of your page's authority and Page Rank to another site, also known as passing link juice to the other website.
  •  On the other hand, when you give links to highly trusted websites like Wikipedia, Google bots recognize your website to be talking of something important and hence render your website trustable.

 3. IMAGE OPTIMIZATION

Visual content like images, infographics and videos make your website colorful and engaging to the reader. Videos when added to your website can help increase your rankings as a user clicks on it and watches the same. Here are some tips to optimize the image on your website:
Image Optimization technique
  • File Name: Google bots cannot view images as it crawls. For the same reason, the file name has some role in making Google understand what the image is about and whether it relates to the web content surrounding the image. Hence, it is suggested that the image file name relates to the web content and there are no spaces in the same. Instead of spaces one may use hyphens and underscores though the former is more preferable.
  • Alt Tag: The above goes for Alt Tags, which are an alternate name to the image used. It is as significant as image file names. In this case, spaces can be used and here text surrounding the image can be really useful.
  • Hyperlinks: In case a hyperlink is added to an image, the Alt Tag works as the anchor text. Again, when providing links to another website from your image, the one who benefits is actually the other website not yours, just like I mentioned under "Linking".

4. AUTHORSHIP OPTIMIZATION

If you have more editorial power this certainly impacts viewership. More the number of viewers, more is the incoming traffic to your blog. When people find your blog useful, it impacts all the other blogs/websites you may write for. Hence it is important to identify yourself online as an author.
Authorship Optimization in SEO

  • To establish your authorship online, you just need to create a Google+ Profile first. Next you need to find "Links" and then click "Edit". On the new window that appears with 3 options, you need to click "Add Custom Link".
  • In the URL section, add your website address and in the label you need to specify the blog title. For me it's "Maryam SEO Analyst".
  •  Next go to your blogger profile and enter your name at the end of the blog post.
  • Click on the name and enter the link which is shown on the URL section of your browser when you click on "Posts" in Google+ Profile.
  • Go to the HTML editor and in the anchor tag containing your name in the blog post, add the code rel="author".
  • At this point authorship is established successfully.
If you follow all the above optimization techniques, you will make it to the top of your search engine, although I don't guarantee that's going to happen soon. It all depends on the competition. If anyone feels that I left out any optimization technique, feel free to post your comments below! 

In my next post, I will be speaking of how to crawl, cache and index your webpages on Google through a very powerful indexing tool called Google Webmaster tools, now known as the "Google Search Console". Meanwhile you can checkout my first blog on the most significant Google Algorithm updates. Stay tuned to my SEO blog for my weekly updates!

Monday 2 May 2016

Google Algorithm Updates for a great Googling experience

How these Google Algorithm Updates came into place?

Have you seen that when you search for something on Google, you are met with thousands of search results, with information that can assist you or give an answer to your question. Google is now the personal assistant of many of us. Google guesses what you are really looking for with about 200 signals that are programmed to analyze the query and the intention behind it.

As a result, Google has emerged to be a powerful internet gizmo for doing great business. Google can track the needs of its users and entrepreneurs can use Google to deliver people what they are looking for.

Entrepreneurs have identified this immense online potential and hence, competed with one another to create websites and then get a higher ranking for their websites on Google.


Being on top would boost business and going to the bottom meant losing customers and thus, a downfall for your business. As a result, people resorted to all sort of tactics, which could make them survive on top in search engine listings. Consequently Google results started declining in quality and content, which in turn would destroy users' confidence in Google.

WHY GOOGLE ALGORITHM UPDATES?

why google algorithmConsidering the users' trust and their chance to make it as a great personal assistant who constantly delivers good results for their queries in terms of quantity and quality, Google adopted measures known as "Google Algorithm Updates" wherein changes were made in Google Algorithms or its programming signals which determine the query, process millions of webpages and return the best results. When these updates were rolled out, they made huge impacts to search engine results, hit several businesses with a blow and also rescued some.

MOST SIGNIFICANT UPDATES IN THE GOOGLE HISTORY

1. Google Panda Update (February 2011):

Ever since Google let out their SEO starter guide, the secret to how some websites made it to the top in search engine listings, Google benefited at first. 

But later Google was being spammed with content which was duplicated and of no quality, or which were filled with meaningless matter and full of grammatical errors. People inserted or stuffed keywords wherever they could.

google panda update
So the Google Panda Update arrived. This update targeted content spammers. Thin pages (webpages having content with very less or no quality), webpages which were content farmed or had duplicated content was completely removed from Google listings.

The Panda or Farmer Update became a filter for all website. Each website which successfully passed these filters or met the terms and conditions of the website was crawled, cached and indexed by Google. Website which did not pass these filters were merely crawled and cached but never indexed.


2. The Penguin Update (April 2012):

As listed out in the SEO Starter guide revealed by Google, websites that had lots of incoming links to it would rank on top in Google listings. People generated links to their website from other websites and also started buying and selling links.

Webpages which were awarded a Page Rank by Google were considered the best websites to obtain links from. This resulted in an aggressive distribution of links by owners of websites having higher Page Rank. Several websites were launched by the same owner under one  host server, solely for the purpose of link building.

The Penguin Update was rolled out to attack such link spammers. Google disallowed selling of paid links as well as getting links from websites which carried out spamming activities.

They also pushed down the website which had doorway pages, i.e., websites which had less or no content. Under this update, websites which had quality links as well as links with trusted websites had higher positions in Google listings.

3. EMD Update or the Exact Match Domain Update (September 2012):

This update was a mechanism by Google which prevented low quality websites from ranking high on Google just because they had their domain name exactly matching with search engine user terms.

It also removed those new websites which were not able to achieve any sort of credibility in the form of Page Rank, in a given time period.


4. The Pigeon Update (July 2014): 

This update was not aimed at penalizing websites but related to local SEO, that is, providing location based search engine results. Google attempted delivering results based on the location of IP address, from which the query was coming from. For example, if someone in New York searched for "Restaurants", Google would return his queries with restaurants based at New York, not in Washington or some other place.Additionally, Geo-tagging or the adding of your location on Google Maps and showing the same on your website was also required.
Websites had to list their business on Google for local visibility, which was verified by a PIN number sent via post to the registered address.
It was also important to submit their website to the locally visible directories online, such as the Yellow Pages.


5. The Hummingbird Update (2013): 

This update focused in semantic search results. Google processed its search engine listings on the basis of the user activity, time spent on a website, the age, educational qualifications and the economic status of the search engine users, all of which were tracked with the help of Google's special cookies or Spy-bots.


6. Rankbrain Update (2015): 

An extension to the Hummingbird algorithm, the Rankbrain update uses artificial intelligence or AI to process search engine results as per the human needs. This update employed AI for tracking the user's needs based on their age group, individual preferences and their recent searches even on websites other than Google.

7. The Mobilegeddon Update(2015): 

The update arrived due to increasing online activity by users on their mobile phones. The update aimed at making the websites mobile friendly and viewing of websites comfortably on mobile phones, without having to tap or zoom.Websites which weren't mobile friendly would be pushed down in Search Engine Rankings or would not be shown in search engines results page in mobile phones.


8. The Pirate Update (August 2012):

It is a filter that was introduced for the purpose of protecting the website owner's rights on copyrighted content.

This update prevented websites that infringed the copyrights of other users' digital content or digital properties.


The victim was able to file a complaint for the infringement under DMCA (Digital Millenniums Copyright Act) under Google, after which Google would verify the exact owner and disable the defaulting party's website from appearing on search engine results.

Google's perpetual endeavor has made it the best tool for not only doing business but for getting answer to whatever you have in mind. Knowingly or unknowingly, Google has become that place where many decisions are taken and where rich information is the key for those decisions.

The above algorithms are part of the many signals that Google continuously and constantly uses to sort the results for the best search engine experience.